How to Buy IOTA
Unless you’ve been living without the internet for the last decade, you’ve definitely heard of Bitcoin. But what about IOTA? The Tangle-based cryptocurrency has been the topic of discussion in many communities. That’s because it focuses on machine-to-machine transactions and can solve some problems that even bitcoin hasn’t managed to resolve yet.
IOTA stands for Internet of Things Application and was developed by a German company. It makes use of the Tangle instead of blockchain technology to allow customers to make transactions with no fees attached, thus making it cheaper than other cryptocurrencies on the market today. What’s the difference between MIOTA and IOTA? A MIOTA is one million IOTA – pretty simple.
This article will teach how to buy IOTA from scratch even without having any experience doing so before, step by step.
The IOTA Technology
IOTA is an open-source distributed ledger cryptocurrency (DLT) focused on “Internet Of Things” (IoT) transactions. It’s different from blockchain because it uses a directed acyclic graph (DAG) instead of sequential blocks to store its ledger. This allows for a faster and more scalable IOTA system with no fees involved. Compared to the blockchain, DAG technology is much less resource-intensive, which means it can perform better as more users join the network.
IOTA has recently partnered up with Microsoft and Fujitsu to develop new protocols for this technology based on machine learning applications. Furthermore, IOTA Tangle is decentralized, so no single entity controls the system or determines who participates in the transaction validation process.
This makes IOTAs transactions trustless and transparent since everyone involved keeps a copy of the ledger history. To achieve consensus between nodes on its network, each node must first verify two previous transactions before submitting its own transaction proposal to the rest of the community members. The sender will validate all other transactions proposed by others prior to making his/hers final confirmation step necessary for validating theirs.
You can find more information about IOTA at their official website. In the next sections, we’ll go over how to buy this cryptocurrency and store it in your wallet.
How to Buy IOTA With USD
People buy IOTA for various reasons. A person may want to invest because they are speculating on the price going up, or they might be keen on buying to diversify their assets.
Others may use the currency as a means to transfer money without incurring high wire fees, or maybe their bank doesn’t allow them to have an account outside of their native country. For others, his is the only way they can access funds from offshore accounts. Some people just like having digital assets and see them as a form of investment or collectible item.
If you’re interested in buying IOTA, you have two options. You could buy it via fiat money or try to generate some yourself. However, earning IOTAs through Tangle’s mining process is rather difficult since it requires specific hardware equipment that most average users won’t have access to.
Instead, if you need more tokens right away you can buy them using cryptocurrencies or fiat currencies listed in exchanges like Binance, PrimeXBT, or Plus500. This way not only are transactions fast but also cheap and simple.
To buy IOTA, you’ll need to visit a cryptocurrency exchange that offers buying/selling through USD or EUR. In this tutorial, we’ll show how to purchase IOTA using Coinbase as it’s one of the most popular exchanges in the market today and has been operating for quite some time now.
The general steps we’ll follow work like this:
- Use a service like Coinbase to buy Bitcoin
- Use the popular Firefly wallet service to get your own IOTA wallet
- Determine the receiving address for your wallet
- Visit Binance, Tormgain, iQoption, eToro, PrimeXBT, Plus500.
- Use your Bitcoin to purchase IOTA on the exchange you choose
- Use your new wallet to store your IOTA
Let’s begin by looking at step one.
Step 1: Get Bitcoin or Ethereum
The process involves opening an account on Coinbase, then connecting your bank account (or credit card) so you can make purchases directly from them.
After verifying your identity and making sure you have enough money available in your account, click the “Buy / Sell” tab at Coinbase homepage which will open up a new window where they offer different cryptocurrencies for sale:
Select Bitcoin (BTC), since currently there are no direct purchases offered by IOTA.
Then click the “Buy Bitcoin” button, which will take you to a new window where Coinbase offers BTC purchases at current market prices.
Enter the amount you want to purchase, then click “Buy Bitcoin.” Enter the amount of USD you want to spend for this transaction, then click continue and confirm your details on the following page. Once done, just wait for Coinbase to process your order (usually takes around one business day).
After your order is completed (it may take a few days, depending on how busy Coinbase’s servers are), you’ll have your bitcoin ready to go.
Step 2: Get an IOTA wallet using Trinity
Now that you have the cryptocurrency, it’s time to look at getting an IOTA wallet. For this tutorial, we’ll use Trinity since it is a secure open-source client based on iotaledger/wallet Tag Tangle. The first thing you need to do is head over here and download it for your computer.
Once the download has finished, extract the file and open it. In order to use Trinity, you’ll need to create a new wallet as well as a new receiving address.
To start, enter your new password created from the first step, then click ‘Create New Wallet.’ From now on, only you will have access to your funds due to the highly encrypted secret seed contained in this wallet.
Take note of your password, the secret seed phrase, and QR code. This information, particularly the seed phrase, are essential as they’ll be needed in the event that you have to restore your wallet or send money from it. Given their importance, you might want to write the details down in a note or on a piece of paper.
Then click ‘Create New Wallet,’ and Trinity will start generating your wallet. Once done, you’ll be taken to the login screen where you need to enter your new password again (first step) then press “Login.”
After logging in for the first time, it’s highly recommended that you change settings like network mode, UI language, etc. It is also best practice not to keep large amounts of IOTA on exchanges, so move them at this point onto a seed generated by trinity or another client as soon as possible.
This way, if something goes wrong with the exchange itself or someone hacks into their servers, all your tokens are safe since they’re stored on an offline device only accessible to yourself. Click here for more information about how these work.

Step 3: Get an IOTA receiving address
If everything worked out fine, Trinity should now show a screen with all details related to your new IOTA address. You can also see how many MIOTAs are stored inside by clicking “Receive” at the top left corner of the window.
What is a receiving address? Basically, it’s a code that allows others to send IOTA tokens to your wallet. This is how you’ll receive MIOTAs purchased from exchanges and even give them out in return for goods or services rendered. You can think of it as your own personal account number, though there are a lot of subtleties and complexities that make the issue a little less simple than that.
In any case, the steps are complete. Now that you have Bitcoins/Etherum ready for purchase as well as an IOTA receiving address where funds will arrive once bought, all that’s left is to visit an exchange and trade your BTC/ETH for IOTA.
Step Four: Visit IOTA Trading Exchange (Binance, Tormain, etc.)
For this tutorial, we’ll use Binance, but other alternatives like Tormain, Etoro, or Plus500 are also good exchanges, with the latter only offering CFD-related crypto-trading, which means you won’t actually buy coins or tokens using them. To start trading now, simply access one of those links above (once it opens) then follow their instructions on how to create a new account if needed, as well as verify yourself via email once completed. You may be prompted to enter some additional details depending on the level of verification required by each specific exchange.
After you’ve created an account, verified it, and logged in to the platform ( Binance, eToro Tormain, or Plus500 ), simply search for IOTA (MIOTA) in the list of available cryptocurrencies by using their respective trading symbols or name, then click on “Buy” which will open up a new window where prices are currently being offered at that moment.
Step Five: Trade BTC/ETH for IOTA
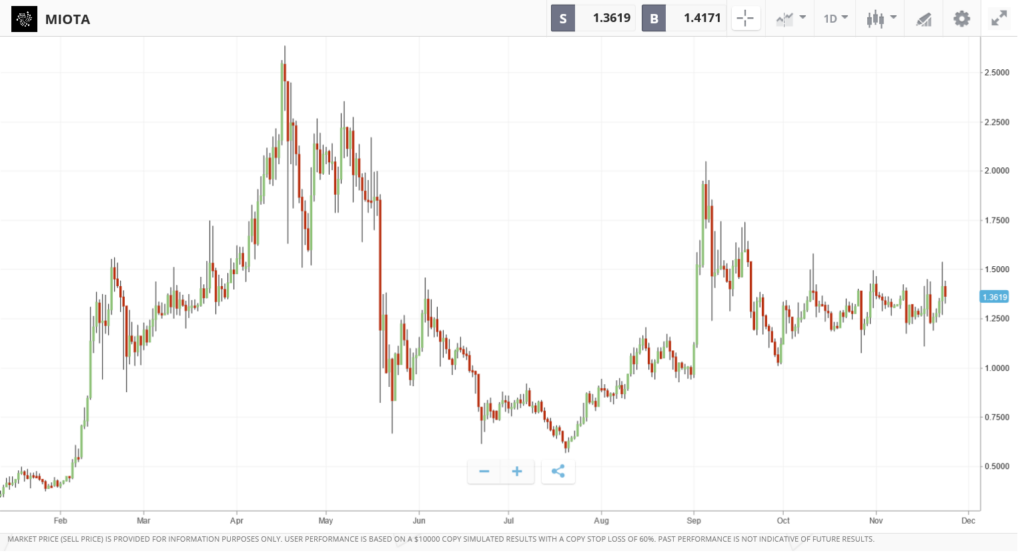
You can choose whether to buy one whole MIOTA if you have enough funds for it right away or buy a fraction of it instead, so there’s no need to spend 100% of your money just because some exchanges don’t offer smaller purchases. To give you an example, when writing this article, each unit of IOTA was worth $1.27 (a bit more than the US dollar).
Once you decide how much you want to buy, simply enter it in the “Amount” box, then click on “Buy.” If successful, your funds should now appear inside Binance’s interface under ‘Funds’ which can be found by clicking on ‘Deposits Withdrawals.
It may take a few minutes for that amount of money to reach your balance depending on current network traffic, so if after 30 min or more nothing has happened, visit the exchange again and check whether everything went through okay. Don’t forget about fees. Since trading exchanges will charge small commissions for each transaction, you’ll need to account for that amount before completing your purchase.
On Binance, this charge is currently set at 0.001 BTC/ETH, which means if you buy MIOTA worth $100, it will be reduced by 0.0001 BTC, so keep that in mind when transferring money from other exchanges or wallets.
Don’t worry though, as soon as the trade has been completed, both currencies being exchanged are refunded to their original balance values after deducting commission fees, thus resulting in no loss whatsoever unless something goes wrong during the exchange process itself (which rarely happens).
If, for whatever reason, your order expires without filling, don’t take any further action. All transactions have a time limit within which they should be executed automatically once initiated – just wait until it’s over.
Step Six: Withdraw your IOTA to your wallet
Congratulations, you now own some MIOTAs. Once the transaction has reached Binance (if not, then wait until that happens), go back to ‘Funds’ and click on “Withdrawals” located at the top right corner of the page next to where you can also access other important menu items like ‘Orders History,’ etc.
Now search for IOTA in the list by clicking on its trading symbol or name (it should be first) – once done, input how much money from your balance you want to send into your personal Wallet/Address. As a safety measure, don’t forget to enable Google Authenticator before attempting another withdrawal, as well as to switch back from “IOTA” over to BTC/ETH (or whatever other currency you’re trading with) before sending your earnings out, just in case.
Once the transfer is completed, and money has successfully reached its destination then congratulations are definitely in order for that hard-earned crypto investment.
What exchanges can I use?
There are a number of exchanges that support IOTA. They include Binance, eToro Tormain, and Plus500 (for CFD related crypto). Please note that, at the moment, Binance.us does not support IOTA, but this is being worked on at present, and they may support it soon.
Conclusion
IOTA is a cryptocurrency that can be used to make secure transfers of data between various IoT devices. Its main purpose is to provide a scalable solution for IoT as it has been created using Tangle technology rather than blockchain, which means there are no blocks and chains involved with transactions, thus making the system more efficient and able to scale better without any fees being charged or miners taking control.
You can acquire IOTA by buying another form of cryptocurrency like Bitcoin, getting an IOTA wallet, finding your IOTA receiving address, visiting an IOTA trading exchange like Torman, Binance, or eToro, and exchanging your Bitcoin or another cryptocurrency for IOTA. Then, simply withdraw your IOTAs.