IOTA Wallet: An Ultimate Guide
While some cryptocurrencies are intended to be used only as currencies, there are others with specific uses. IOTA is one of those. The IOTA network links the Internet of Things together to make automation easier.
IOTA is structured in an unusual way, which we’ll cover shortly. That structure makes the IOTA wallet work a little bit differently. If you’re setting up the IOTA wallet – known as Firefly – you’ll want to make sure that you set everything up correctly. That’s where this ultimate guide to setting up an IOTA wallet comes in.

What Is IOTA?
IOTA (ticker sign MIOTA) is a cryptocurrency similar to Bitcoin or Ethereum. However, instead of functioning as a currency that is paired with a blockchain, IOTA uses a decentralized, cryptographic network called Tangle. This network means that IOTA can scale more easily than Bitcoin or Ethereum since transactions aren’t limited to being processed in blocks.
IOTA was announced in October 2015 by Sergey Ivancheglo, Serguei Popov, and David Sønstebø. Dominik Schiener, who joined later, helped co-found IOTA. The design is geared towards improving the Internet of Things (IoT) concept.
The IoT concept refers to the now billions of devices connected to the internet. By enabling data sharing and cross-talk between these devices, automation and data collection becomes much easier.
The goal of the IOTA Foundation, the nonprofit behind the IOTA cryptocurrency, is to bring cheap hardware costs through their Tangle network. By using a decentralized network rather than hardware in-house, a business can set up its own Internet of Things for less money.
In this case, IOTA acts as a machine-to-machine currency used to transact this data between devices. However, IOTA can be purchased from crypto exchanges much like any other cryptocurrency.
Where to Buy IOTA
Before you can set up your own IOTA wallet, you’ll need some of the cryptocurrency itself to get you going. Because IOTA is not very popular at the moment, there are only a couple of places where you can grab this coin. Here are some of the exchanges that are currently selling IOTA:
- Stormgain: This exchange features low trade fees, making it a cheap option for you to grab some IOTA.
- eToro: One of the larger platforms on this list, eToro lets you buy, sell, and move cryptocurrency at your leisure.
- Binance: For the European users out there, the site features a couple of different Iota crypto trading pairs.
- PrimeXBT: For those that enjoy margin trading, this exchange will allow you to do so with IOTA.
- Plus500: This exchange features CFDs for IOTA, rather than the coin itself, as a purchasable asset.
While there are plenty of places out there to buy cryptocurrencies, exchanges will be your best bet to get some IOTA. This is because exchanges allow you to transfer the crypto off the platform once you buy it. Since our goal is to move the Iota into a wallet that we set up, this feature is mandatory for our purposes.

Setting Up an IOTA Wallet
Once you’ve chosen an exchange and purchased some IOTA, you’ll need to get a wallet set up to transfer the idea into. If you’ve never set up a wallet before, it can be a technical process. Here’s a breakdown of the steps you got to take to get a wallet set up for IOTA, which is a little different than a standard cryptocurrency:
Step 1: Go to the IOTA GitHub Page
The first step you need to take is getting the wallet software from the right place. When it comes to cryptocurrency, the best place to go is the source of the project. In this case, IOTA’s Firefly wallet is available from the IOTA GitHub page.
You must go directly to the developer source for crypto wallets, not just IOTA’s. Unfortunately, there are some folks out there that would try to scam people out of their cryptocurrencies. One of the ways that they do this is by putting out bad software that gives them access to your wallet’s funds.
By going directly to IOTA’s GitHub page, you ensure that you’re getting malware and backdoor-free software that will keep your coins safe.
Also, make sure that you’re getting the Firefly version of the wallet. There are two legacy wallet projects out there, both official to the IOTA Foundation: Legacy and Trinity. Both of these wallets continue to stay up for legacy purposes. The oldest legacy wallet is not usable right now, and the Trinity wallet is not fully supported. The developers for IOTA recommend the Firefly wallet.
Step 2: Download and Install the Most Recent Version of the Wallet
Currently, there are 11 releases for the Firefly wallet on IOTA’s GitHub page. If you want to make sure you’re downloading the right one, make sure that you click on the release that has the “Latest” tag.
The release of this tag is the most up-to-date version of the wallet and is the safest to use. GitHub usually displays this file on the right-hand side of the webpage for ease of access.
When you go to save the file, make sure that it goes into a folder you can easily reach on your device. For Windows users, this will be any folder that your user account has access to. For Mac users, the wallet file should download into your Downloads folder.
Once you’ve been able to download the file, run the program and the installation process will start.
Step 3: Choose the Correct Version of the Wallet For You
When you’re on the application to set up the wallet, one of the first windows that pops up will ask you to choose the version of the wallet that you want to install. The two options that are presented to you are “Light” and “Full Node.”
If you’re setting up this wallet to just send and receive IOTA, then you only need the Light wallet. This option sets the wallet up so that you can transact with IOTA using the program interface. In this way, it’ll work like a lot of the other wallets out there for different cryptocurrencies. You’ll be able to give your wallet address to receive IOTA and input other addresses to send IOTA to those addresses.
The Full Node option has advanced controls for running nodes on the Tangle network. Unless you’re looking to set up a node and have some proficiency with coding, this won’t be the option you need.
Step 4: Connect to a Server
Once you’ve got your version of the wallet selected, the next prompt will ask you to choose a server to connect to. These servers are going to be the method by which you connect to the broader Tangle network.
If you have a server in mind that you already want to connect to, this is your opportunity to choose it from the drop-down menu. For example, if you’ve already got a server setup that you’re using for your business, you should see the server here once it’s been authorized.
Otherwise just using IOTA’s Bitfinex will work for most people. That address is http://iota.bitfinex.com:80.
Step 5: Generate a Seed for the Wallet
This is probably the most important step to setting up your wallet. To make sure that other people don’t have access to your funds, crypto wallets establish both public and private addresses. The public address is the one that you give out to receive funds from others, while the private address is the one that you keep safe to recover your wallet in case something happens to it.
This seed is going to be how you log into your IOTA wallet once it’s ready. It’ll be an 81 character long-phrase made of letters and the number nine.
To generate the seed, you’ll use IOTA’s built-in seed generator. While there are some third parties out there that can generate Iota seeds, it’s best to keep this process within IOTA’s environment. That way, there’s no chance that an outside force can steal your private address and take your crypto.
Once you have the seed generated, make sure that you back it up in a way that you can use later on to recover your wallet. Iota allows you to create a cryptographic copy of your private address to use later.
It’s also standard practice in the crypto world to write down your private address on a sheet of paper and store it somewhere safe. This way, you’re covered no matter what.
Step 6: Log Into Your Wallet and Transfer Your IOTA
Once you have your private seed generated, you’ll be able to log into your wallet using that seed. The Iota wallet has a simple interface and is pretty easy to navigate. Once you’re logged in, he wants to make sure that you connect to the Tangle network so you can send and receive funds. Tap the “Attach to Tangle” option on the homepage to do this.
Now that the wallet is all set up, you’ll be able to transfer any IOTA that you have on your cryptocurrency exchanges into the wallet itself. Go into the exchange and find your Iota Holdings. Select the “Withdraw” option and enter the public address for your IOTA wallet. Double-check everything before you hit submit and you should have the Iota in your wallet relatively soon.

What Makes IOTA Unique
IOTA is a blockchain without blocks. Think of it as the next generation of blockchain. IOTA uses a distributed ledger called Tangle, but instead of discrete blocks of transactions, multiple nodes can record transactions at different point. odes can process transactions and send that data back to other nodes without waiting for their turn like they would in a blockchain.
The way the Tangle network processes transactions is by looking for two previous transactions from that address and that node. Because this requires a lot less data than a Bitcoin transaction, IOTA doesn’t require any dedicated miners or masternodes for the transactions. This reduces the overall hardware requirements to keep the system running.
All of this design feeds into IOTA’s end goal, which is to improve the Internet of Things capabilities of devices. By creating an environment that is fast, reliable, and inexpensive on fees, Iota is trying to make it easier for devices to communicate with one another. As adoption grows, IOTA will enable the IoT to provide smoother automation and more efficient systems.
The Iota Foundation is a crypto project with a specific end goal. In that sense, IOTA is different from a cryptocurrency like Bitcoin, which is intended only as a currency and store of value.
The Future of IOTA
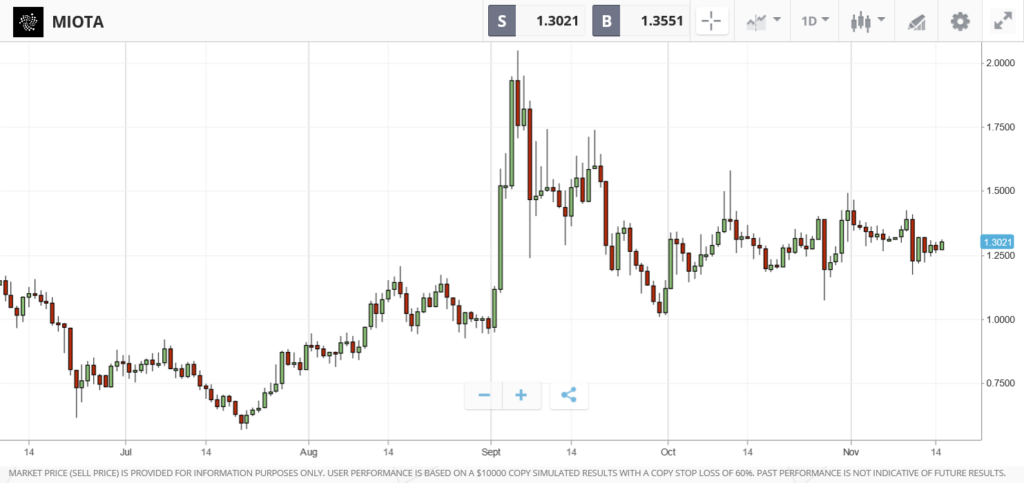
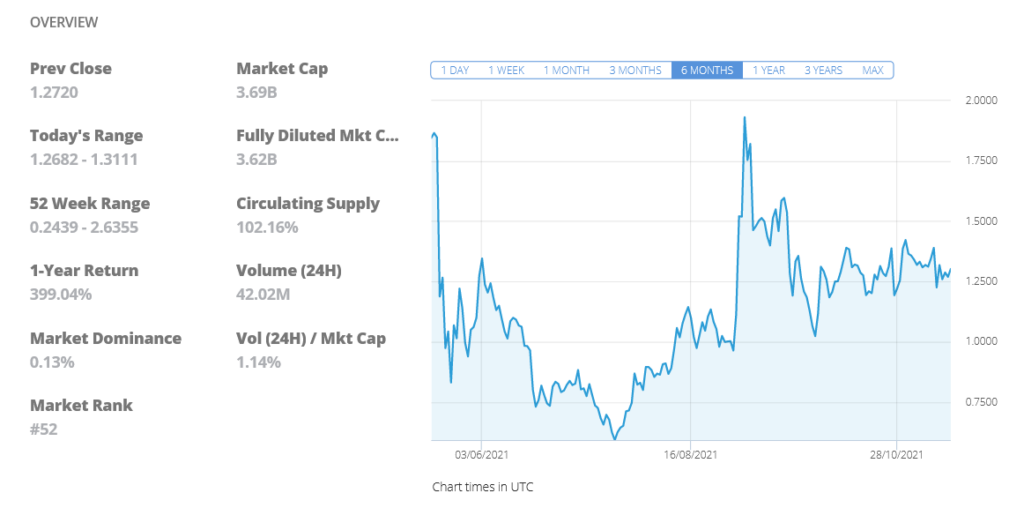
Right now, Iota is still down from its all-time high back in 2017. However, there are no additional Iota coins to mine or mint. The 2.77 billion coins in circulation right now are the maximum amount that there ever will be.
As time goes on and IOTA is adopted by more companies, there should be greater demand for the coins that are in the market right now. This influx of buyers alongside a static supply should cause the price of IOTA to steadily increase over time. Price predictions for this coin will be difficult because the rate of adoption is unknown.
In terms of utilization, the IoT concept isn’t going away anytime soon. More and more businesses are finding ways to automate the communication between their devices. IOTA’s long-term success relies on reaching and winning those companies..
As long as Iota continues to maintain the network and make sure that it runs smoothly, the price of this coin should continue to go up steadily for years to come. Cryptocurrency is a volatile market, however. Expect this growth with high peaks and low valleys as time goes on.
Summary
While not backed by the same kind of network as other blockchain cryptos, setting up an IOTA wallet is similar to doing so for another cryptocurrency. Make sure that you download the wallet application from IOTA’s GitHub page and follow the on-screen instructions. Always store your seed phrase somewhere secure so you can recover your funds if needed.


